Tuesday, June 19, 2012

How to Watch DVD's on the iPad

If you have an extensive collection of DVD's lying around, you might be wondering how you can watch them all on your iPad or iPhone. There's nothing quite like watching a movie whilst travelling or when away from home, and the experience can be even better than playing a physical DVD because movies start instantly on iOS. The iPad is an especially good video playback device due to the large screen size and hi-resolution display. HD (1080p or 720p) movies play brilliantly, and it's possible to transfer quite a number of films to the iPad – depending upon the storage capacity you have available.

This article describes the basics of how to watch movies on your iPad.

Introduction

The general process of getting a movie onto your iPad is:

  • Insert a DVD movie into your Mac
  • Download a video conversion application
  • Encode and copy the video to your computer
  • Import the movie into iTunes
  • Synchronise iTunes with your iPad

There are numerous apps that can help you with the conversion process from DVD to iOS. Some of these apps are relatively complicated, but there are many dedicated apps in the App Store with straightforward settings and simple interfaces. Note that many such apps refuse to convert copy-protected DVD's, but there are usually upgrades or patches available which can get around these limitations. Please be aware of copyright laws and make sure that you don't infringe anybody's copyright!

By far the best option is to obtain some software which can copy the DVD and convert to the correct audio and video formats for iOS, rather than more traditional conversion which is limited to files (i.e. not discs) – in that case, you'll need a separate app to copy the movie files off the DVD to your Mac and another to convert them to the correct multimedia format to play on the iPad.

Apps to Convert DVD's For The iPad

Clone2Go DVD Ripper is one of the best applications available in the App Store to copy (sometimes called "rip") DVD's to your computer. If you don't want to shell out any cash then you can also use a combination of VLC Player and Handbrake to achieve the same results, but you might need a little more technical know-how. The benefit of the Clone2Go DVD Ripper app is that it has inbuilt presets to convert the video to the correct format with simple drag-and-drop interfaces, and everything can be done in one program.

Convert DVD's to iPad with Clone2Go DVD Ripper

Website: App Store, Clone2Go

DVD Ripper has a simple interface which makes it a doddle to convert a DVD. There are lots of built-in presets which are already setup for the target device you want to play on (for example, the iPad, iPhone 3GS, iPod Touch, Apple TV, and all manner of other multimedia devices). There are also options to manually tweak the output formats and bit-rates (i.e. the quality of the video) and a choice of multimedia formats (such as H.264 and MPEG-4 video, AAC and MP3 audio) to get the optimal settings. For example, you might want to use a higher quality setting if you feel that the presets aren't good enough. DVD Ripper is also one of the cheaper DVD ripping apps. Once you've copied and converted a DVD, you'll have to import it into iTunes (more on that later).
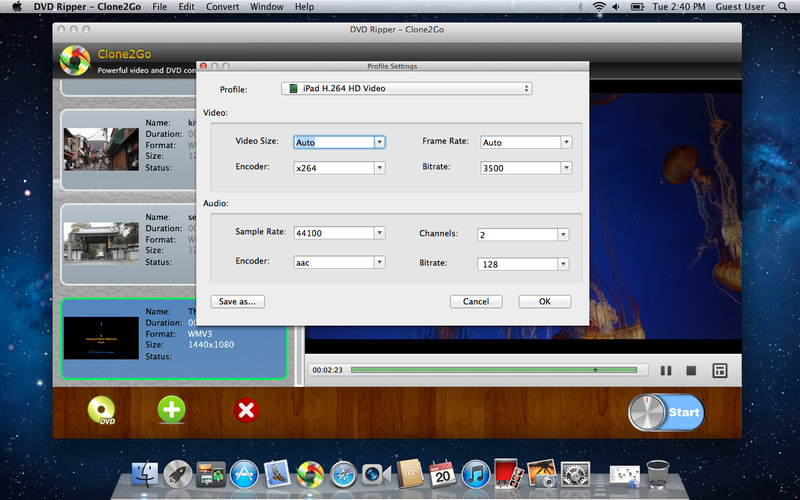
Clone2Go DVD Ripper app

Copy Your Movie onto the iPad

Once you've managed to convert a DVD to a file in the correct format for iOS, the next step is simply to import the movie into iTunes and perform a sync with the iPad.

From the iTunes File menu, select Add to Library or just hit COMMAND + O and select the movie you want to import. Once that's done, it should appear in the Films section of iTunes. Now, just sync with your iPad in the usual way, and the movie should be there and ready to play!

sync DVD movies to iPad


Sunday, June 3, 2012

Clone2Go DVD to iPod Converter Giveaway

Fond of several great DVD movies and want to watch them on your iPod Touch? Still looking for a way to transfer the movies to your device? For this to be done correctly and easily Clone2Go DVD to iPod Converter Giveaway is alive from June 1 to June 30, 2012.

Clone2Go DVD to iPod Converter Giveaway

Apart from ripping DVD's to iPod supported video or audio, Clone2Go DVD to iPod Converter can also be used to convert video for iPod and download YouTube video for iPod. The output profile isn't limited to iPod as well. The optimized presets include iPad, iPhone, Apple TV, FLV, AVI, MP4... as well.

Clone2Go DVD to iPod Converter Profile

How to Win Clone2Go DVD to iPod Converter?

Clone2Go DVD to iPod Converter Giveaway is exclusively available at Facebook. You only need to leave a comment below Clone2Go Giveaway and then wait for the license code within 24 hours. The Giveaway lasts for a whole month from June 1 to June 30, 2012.

Clone2Go DVD to iPod Converter Profile

Key Features of Clone2Go DVD to iPod Converter


  • Rip DVD to iPod/iPad video
  • Convert video to iPod/iPad: Convert all popular video formats for iPod and iPad, including AVI, WMV, ASF, 3GP, QT, RM, RMVB, FLV, MKV, AVS, MPG, VOB, DV, M1V, M2V, DAT, AMV.
  • Extract audio from DVD and video files
  • Capture and convert DV video: Capture videos taken by DV camcorders and convert the captured video files to iPod/iPad.
  • Download and convert YouTube video
  • Trim DVD/video clips
  • Customize an output profile
  • Select DVD audio track and subtitle

Wednesday, May 30, 2012

How to Burn AVCHD MTS to DVD

What is MTS?

MTS is a file extension for the high definition digital video camera recorder format, AVCHD (Advanced Video Codec High Definition). AVCHD is a file-based format for the digital recording and playback of high-definition video. The AVCHD format records video using the MPEG-4 AVC/H.264 video codec, and audio in Dolby AC-3.

To burn MTS to DVD, you need first convert MTS to AVI. The Clone2Go Free Video Converter does the trick. Then you can import the output AVI into a DVD authoring application like Photo DVD Burner for burning to DVD.

Now let's take a look at how it performs to burn MTS to DVD with Free Video Converter and Photo DVD Burner.

Part 1. Convert MTS to AVI

1. Download and Install Free Video Converter

Download link: http://www.clone2go.com/video-converter/ 

2. Import MTS into the Free Video Converter

Click the "Add Video" button to import resource files. Alternatively, you can drag and drop MTS files to the main panel of Free Video Converter.

Convert MTS

3. Choose Output Format

From the "Profile" drop-down list, choose "Customized AVI Movie (*.avi)" as the output format.

Note: You need to set the "video codec" to "msmpeg4v2" in order to get the converted avi files successfully imported into Photo DVD Burner.

Burn MTS to DVD

4. Start to Convert MTS to AVI

Click the "Start Encode" button to start to convert MTS to AVI.

Part 2. Burn Converted AVI to DVD in Photo DVD Burner

After the MTS files are converted into AVI video, you can launch Photo DVD Burner and import the avi files for burning to DVD.

1. Launch Photo DVD Burner

2. Import AVI Video

Burn AVCHD MTS to DVD

Click "Organize->Add Video Clips..." to input the video resource.

3. Burn Video to DVD

Burn AVI to DVD

Click the "Burn Disc" button to go into the burning interface.

Burn MTS to DVD

4. Choose Output Format

Choose the "DVD Video Disc" from the Output Format drop-down list.

5. Start to Burn DVD

Click the "Burn Now" button to start the burning. After the whole process is completed, you can enjoy your DVD.

Sunday, May 27, 2012

How to Import M2TS into Windows DVD Maker

What is M2TS?

M2TS is a filename extension used for the Blu-ray Disc Audio-Video (BDAV) MPEG-2 Transport Stream (M2TS) container file format. It is used for multiplexing audio, video and other streams. It is based on the MPEG-2 transport stream container.This container format is commonly used for high definition video on Blu-ray Disc and AVCHD.

M2TS files are used primarily with Sony hardware. Camcorders make use of M2TS in the form of AVCHD, a recording format made specifically for camcorders. Some camcorder models from Canon also use M2TS files. These files are also present on Blu-ray disc compilations, therefore they are capable of storing quite a large amount of information and data tracks.

How to import M2TS into Windows DVD Maker?

If you want to edit the camcorder captured AVCHD M2TS video file in Windows DVD Maker and burn M2TS to DVD within DVD Maker, you need to convert the M2TS video first, as Windows DVD Maker only supports video formats such as avi, mpg, m1v, mpeg, mpe, mpv2, wm, wmv, dvr-ms, wtv and asf.

Windows DVD Maker supported formats

You can get Clone2Go Free Video Converter to help you simply convert M2TS to AVI first.

Let's take a look at how it performs to convert M2TS to AVI for burning to DVD with Windows DVD Maker:

1. Download and Install Free Video Converter

download link

convert m2ts to avi with free video converter

2. Import M2TS into Free Video Converter

3. Choose AVI as Output Format

Note: You need to set the "video codec" to "msmpeg4v2".

4. Start to Convert M2TS to AVI

5. Import Output AVI into Windows DVD Maker

6. Burn AVI to DVD within DVD Maker

Done.

How to Convert DVD to iTunes for iPad/iPhone/iPod Touch Using HandBrake

No doubt you can purchase movies from the iTunes ready for playback on iPad/iPhone/iPod Touch, but if you already own the DVD, you don't want to waste your money on the same movie a second time. Instead, you can rip the DVD to an MPEG-4 video file on your computer, add it to iTunes Library, and then sync it to your iPad/iPhone/iPod Touch. The program I'd like to recommend to do this is called HandBrake, and it works great on Mac OS X 10.7 Lion.

Step 1. Download HandBrake from http://handbrake.fr/?article=download to Mac and install it.

rip DVD on Mac with HandBrake

Step 2. Insert a DVD and launch HandBrake. If HandBrake doesn't recognize the DVD as a source automatically, you may have to click "Browse" and direct HandBrake to your DVD drive.

Step 3. HandBrake will analyze the DVD and let you choose the title and chapters you want to rip for your iPad/iPhone/iPod Touch (in general, you'll want the first title and every chapter). You can get an idea of which title is the main DVD title by choosing the title duration that matches the movie's playtime.

Step 4. Click the "Presets" button on the top right of the HandBrake window on the Mac. You'll see several presets; choose the iPhone and iPod Touch or iPad preset.

Step 5. Now just click the Start button and sit back while HandBrake rips the DVD to one big file. This can take a while, so you won't be able to rip a DVD on your way out the door to the airport. Make sure you plan ahead.

Step 6. When HandBrake finishes ripping the DVD, drag the file into iTunes for syncing to your iPad/iPod Touch/iPhone whenever you want to.

Though HandBrake works great for ripping DVD on Mac, it:

1. Cannot merge DVD chapters into as a single file. You will get sparate video files rather than a whole movie file.
2. Cannot preview the movie before encoding.
3. Cannot trim the movie segment.
4. Cannot extract sound tracks from DVD as audio file.
5. Only supports M4V, MP4, MKV, AVI, OGM output formats.
6. Cannot well customize profile for the output file.
7. Only supports a few mobile players like iPod Touch, iPhone, Apple TV, etc.

So if you need advanced DVD ripping features, HandBrake may not be the perfect choice. It is recommended downloading Clone2Go DVD Ripper for Mac to rip DVD to all popular video or audio formats on Mac OS X (including OS X 10.7 Lion).
